🎯 Introduction
In modern ISP networks, MikroTik routers + RADIUS servers form the backbone of user management and authentication.
Without proper integration:
- Users can bypass billing
- Bandwidth control becomes inconsistent
- Manual management increases
With RADIUS integration:
- Authentication becomes centralized
- Billing and network sync perfectly
- Automation becomes possible
👉 This guide explains step-by-step MikroTik + RADIUS integration, using real ISP scenarios and Zal Ultra ISP CRM.
🌐 What You Need Before Starting
Before configuration, ensure:
- MikroTik Router (RouterOS installed)
- RADIUS Server (Zal Ultra recommended)
- Public or reachable IP
- PPPoE or Hotspot setup
- Basic networking knowledge
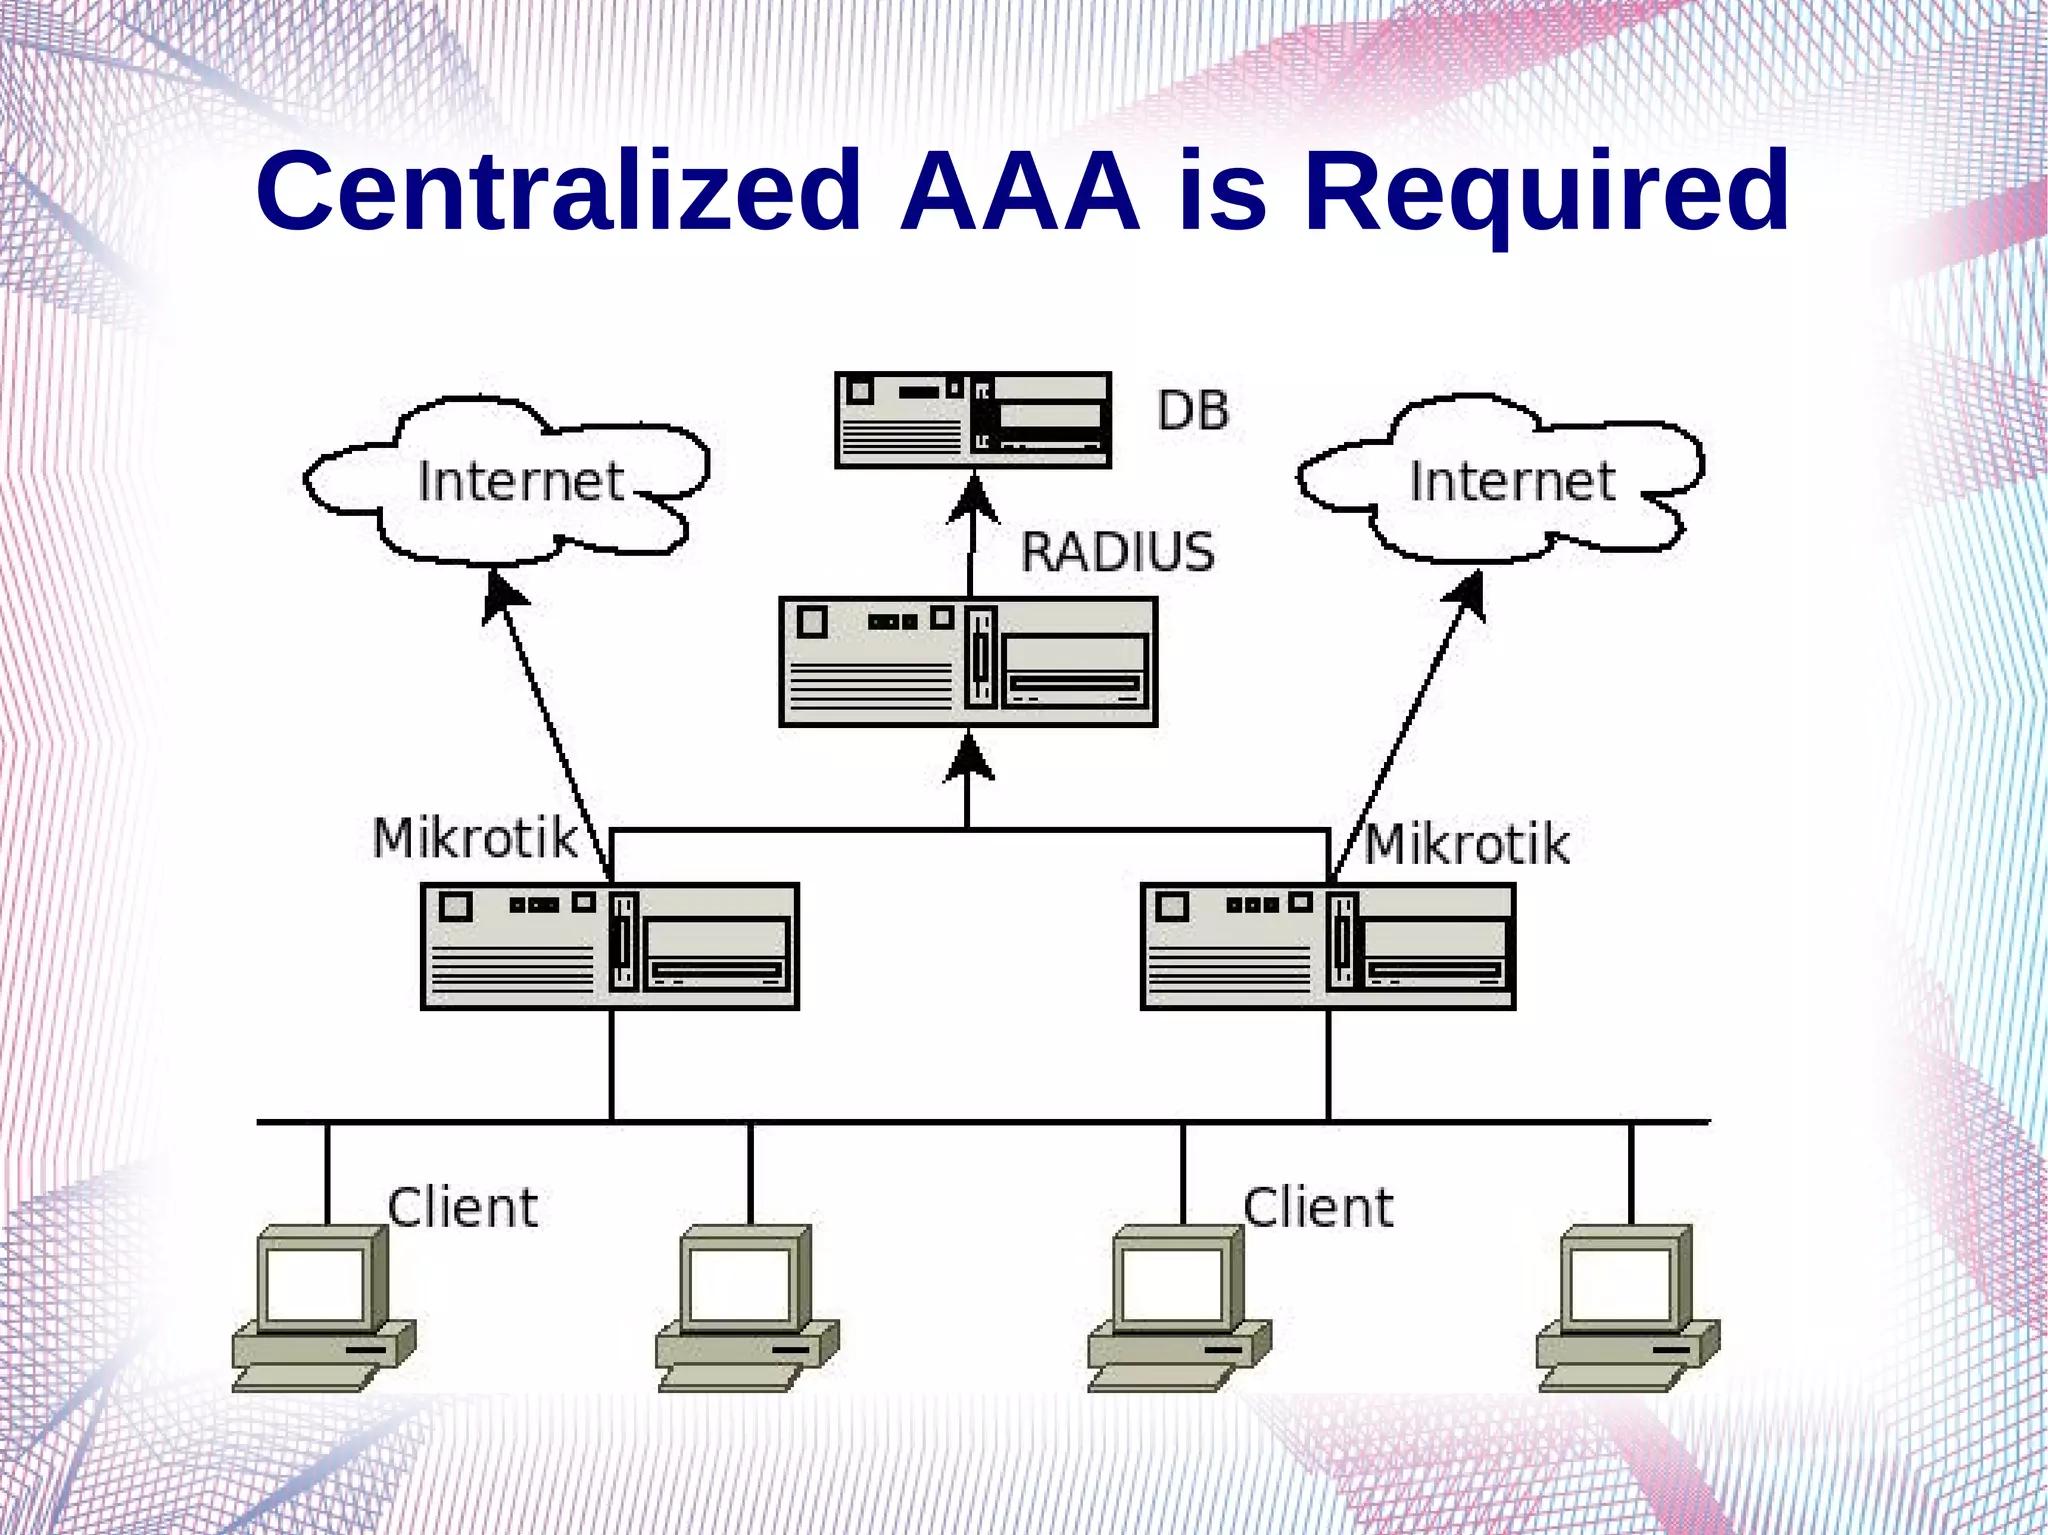
🔄 How MikroTik + RADIUS Works


Flow:
- User connects via PPPoE
- MikroTik sends login request to RADIUS
- RADIUS verifies credentials
- Returns:
- Access permission
- IP address
- Bandwidth limit
- MikroTik applies rules
- Session starts and accounting begins
⚙️ Step-by-Step MikroTik Configuration
✅ Step 1: Enable PPPoE Server
- Go to: PPP → PPPoE Server
- Enable server on desired interface
- Set service name
👉 This allows users to connect via PPPoE
🔌 Step 2: Add RADIUS Server in MikroTik
- Go to: Radius Menu
- Add new RADIUS server:
- Service: PPP
- Address: Your RADIUS IP
- Secret: Shared secret (must match server)
- Authentication Port: 1812
- Accounting Port: 1813
👉 This connects MikroTik to your RADIUS system
🔑 Step 3: Enable RADIUS Authentication
- Go to: PPP → Secrets
- Remove local users (optional)
- Enable “Use RADIUS”
👉 Now all authentication goes through RADIUS
📦 Step 4: Configure User Profiles
- Create profiles in RADIUS (Zal Ultra)
- Define:
- Bandwidth (e.g., 10 Mbps)
- Session timeout
- IP pool
👉 MikroTik will apply these automatically
📊 Step 5: Enable Accounting
- Ensure accounting is enabled
- Track:
- Session time
- Data usage
- Login/logout
👉 Important for billing integration
🚀 Configuration with Zal Ultra ISP CRM


👉 With Zal Ultra ISP CRM, the process becomes easier:
- Built-in FreeRADIUS
- Pre-configured attributes
- GUI-based subscriber management
- Real-time monitoring
What You Do:
- Add router (NAS) in system
- Create packages (speed, expiry)
- Add users
- Connect MikroTik
👉 Everything else runs automatically
🔥 Real Example (Practical ISP Setup)
👉 Scenario:
- 100 users
- Package: 20 Mbps / Monthly
Process:
- User connects via PPPoE
- MikroTik sends request to RADIUS
- Zal Ultra verifies user
- Assigns:
- IP: 10.0.0.x
- Speed: 20 Mbps
- Tracks usage
👉 If payment expires:
- User is auto suspended
- Internet stops instantly
⚡ Advanced Features (Pro Level)
🔄 CoA (Change of Authorization)
- Change bandwidth instantly
- Disconnect user remotely
- Update session without logout
📊 Dynamic Bandwidth Control
- Different speeds for different users
- Time-based packages
🌐 Multi-Router Integration
- Connect multiple MikroTik routers
- Central control via RADIUS
❌ Common Mistakes (Avoid These)
- Wrong RADIUS secret
- Firewall blocking ports (1812/1813)
- Time mismatch between server/router
- Not enabling accounting
- Using both local + RADIUS users
🔒 Security Best Practices
- Use strong shared secret
- Restrict RADIUS access by IP
- Monitor failed login attempts
- Regular backup
🏆 Why Use Zal Ultra ISP CRM for This Setup
- Built-in RADIUS (no extra setup)
- Supports 50+ routers
- Real-time monitoring
- Automated billing integration
- Scalable for large ISPs
📌 Final Thoughts
MikroTik + RADIUS integration is not just a configuration—it’s the foundation of a scalable ISP network.
If implemented correctly:
- User management becomes automated
- Billing becomes accurate
- Network becomes controlled
👉 Using a system like Zal Ultra ISP CRM, you can manage everything from a single platform.